Home Video Games Blog Workflow of Game Art Outsourcing Studio
Workflow of Game Art Outsourcing Studio

Before starting work on a video game or any other project, every game studio needs to develop a step-by-step plan. In the gaming industry, we call it the workflow of game art. This is necessary not only for the designers but for the clients too because they need to have regular updates, feedback, and revisions to ensure the art assets align with the vision.
We also have a game art workflow for the department of our company that outsources the game art. It provides our professional approach, constant meeting project deadlines, and maintaining quality standards. Today, we want to share our game-creation process and explain what a workflow in game design is and how significant it is for the best game studios.

Pre-Production Process We Follow
Of course, we would like to dive right into the action but the pre-production process is very important in the game studio workflow. Due to this, we can understand the client’s goals, vision, and requirements. Also, specifying the artistic style, scope, and technical specifications of the future game is extremely important for a successful project.
In general, this step is a fundament for the whole game and a reliable preparation for the next phase – concept art development.
Character Concept Art Pipeline
This is the time for the most engaging and intricate process of game creation – character development. Sometimes, providing character concept art and character design services reminds us about magic: only wizards can breathe life into pixels, making them bright, fascinating, and unforgettable.
The game character workflow of our studio starts with research and inspiration. Our artists should gather reference materials, such as images or concept art to create the character’s design and make it organic with the environment. To dive even more into this process, we can use AI generations, but it’s an optional step.
The interim step is sketching. Our designers need it to visualize different character ideas. These sketches are simple and focus on capturing the character’s essence. After that, the experimental part enters into force. Artists detail sketches, focusing on the character’s proportions, poses, and clothing details. And we don’t forget about color palettes! The character’s visual identity should be outstanding.
To complete the game character workflow, our design studio creates a final concept art piece for the 2D or 3D character. We showcase them from multiple angles with different expressions or poses. And that’s it: the main step of the video game workflow is finished!


Art Production Workflows
Our team’s art production varies depending on the client’s requirements for a project. However, we still have 4 common stages. Among them are:
- Asset creation: Sometimes it’s just character design, sometimes environment design… But usually, we have complex tasks including 2D or 3D modeling, texturing, and animation.
- Digital painting: Creating 2D art assets, such as illustrations, backgrounds, or textures, is very significant for the game.
- Animation: With the use of 2D or 3D animation techniques, we animate characters or objects.
- 2D and 3D modeling: 2D and 3D modeling process steps include characters, props, or environment creation.
3D Modeling Workflow for Games - 6 Steps
Our studio’s 3D game modeling services have a specific process. For our team, the most efficient workflow for 3D game modeling has 6 steps, and the first one is understanding the project requirements and artistic vision. In this phase, we discuss the design, style, and functionality of the 3D models with the game’s creative team.
Next, we choose the best approach. To make the process faster, we use reference images to guide the modeling process. This helps us a lot in visualizing the final result.
The most responsible phase is modeling. 3D game modeling workflow is a very complex process because you start with basic shapes and a low-poly version of the 3D model, and then add details such as surface textures, fine-scale features, and shapes.
Where would we be without the QA stage! After discussing every 3D model with the clients, we check everything twice, add some extra details, optimize the 3D model to ensure it runs smoothly in the game engine, and then import it.

TOOK
the Task
Choosing the
Best Approach
Box
Modeling
Modeling
& Texturing
QA STAGE
DELIVERY /
ADDITIONAL WORK

How We Create Isometric Game Assets
To achieve a 2.5D visual impact in game development, a common approach is to use isometric game assets.
Why are they so important for the video game workflow?
They give the illusion of a 3D environment while still maintaining the 2D graphics.
Sounds cool, right?
Isometric game asset workflow starts with deciding on the isometric grid size, viewing angle, and art style (for instance, pixel art, hand-drawn, or 3D). We need these details to create the concept art and establish a consistent visual style.
For the next step, we start with creating simple 3D shapes or objects using 3D modeling software. Then we draw the object directly on the isometric grid, making sure it fits the perspective. The main rule of our designers: don’t forget to pay attention to the proportions and angles.
After adding textures, shading, and fine-scale features, we use our secret unique render technique, and the game asset creation workflow is nearing the end. Everything, that we should do at the end, is to export the asset in the appropriate format and deliver it to the game development team.
3D Game Animation Workflow
3D animation outsourcing is a very intricate and difficult process that consists of many details and a total focus on the process. Usually, our team starts with reference collection, moving smoothly to designing and modeling 3D characters with rigs that are ready for animation.
The next stage focuses on establishing the character/object’s movements and timing without fine details. To define the most critical poses and movements within the animation, we create keyframes. By adding secondary motions, and transitions, and adjusting the timing of keyframes, we ensure a smooth flow of animation.
What a stylized game art workflow without polishing! We focus on details such as subtle movements, weight shifts, and facial nuances to make the animation look as natural and realistic as possible.
What’s next? Optimization of the animation data by reducing unnecessary keyframes and delivering the final animation to the development team for implementation in the game.


Reference collection
RIGGING SKINNING
Animation Blocking
Polishing
Unity/Unreal import (check)
Render
Final
delivery
2D Game Animation Workflow
The process of outsourcing 2D animation isn’t so different from 3D animation and consists of 5 steps:
- Reference Creation
We create storyboards to plan the animations.
- Pose creation
We create key poses that represent the significant moments in the animation, such as the starting and ending positions.
- Rigging
We create a digital skeleton or armature for the character to make it look realistic.
- Animation
Firstly, we create the in-between frames to make the animation smoother and more fluid. Then we add secondary animations (hair movement, cloth dynamics, or secondary object interactions) to enhance the realism or personality of the characters or objects.
- Final export
After optimizing the animation data, we export the final animation in the appropriate file format and deliver it to the development team for implementation in the game.


VFX Pipeline We Follow
We have a special workflow for VFX too!
Our team is well aware of how professional game VFX solutions impact the game's atmosphere and the players' experience in general.
No matter do we provide VFX or game real-time FX services, the first step in VFX video game workflow is REF. After that, we smoothly move to the creation of 3D models, textures, 2D elements, and shaders for VFX assets.
At this stage, we should animate all the 2D and 3D elements, such as characters or creatures, or simulate physical effects like smoke, fire, or fluids. Realistic movements and interactions are very important to us, so we also work with dynamics, physics, and particle systems.
Before rendering the final VFX shots, we always combine live-action elements, 3D renders, and 2D assets in compositing software such as Adobe After Effects or Nuke. And that’s it! Everything is ready! As a result, we provide the finalized VFX shots in the required format, resolution, and specifications for integration into the final edit.
Of course, this process is very intricate and sometimes there are many other steps, but these are the main ones that we have in every VFX video game workflow.


3D Game Character Workflow
Every professional 3D character design studio should know all the details about creating high-quality, bright, and memorable 3D characters. Let’s dive into the intricate details of game character workflow.
As always, we start with concepts to define the character’s appearance, style, and overall design. After that, we focus on creating a low-poly game art workflow. In this phase, our team creates 3D models of the characters and captures their basic shapes and proportions. When everything is ready, we move to work on high-poly models with a lot of details, such as wrinkles, clothing folds, and fine features.
The next step is retopology: creating a clean and optimized 3D model with a low polygon count to efficiently use it in real-time rendering. For creating textures and defining the character’s skin, clothing, and other materials, we need to unwrap the 3D model and create UV maps, which are 2D representations of the model’s surface.
In the end, all that we should do is optimize the character’s 3D model, textures, and animations, and deliver the character assets to the development team for integration into the game.

Concept
3D
sculpting
Low Poly
Retopology
UV \ Maps
Baking
Texturing
Ready
Assets

If you want to know more about how long it takes to model a 3D character, you can read this.
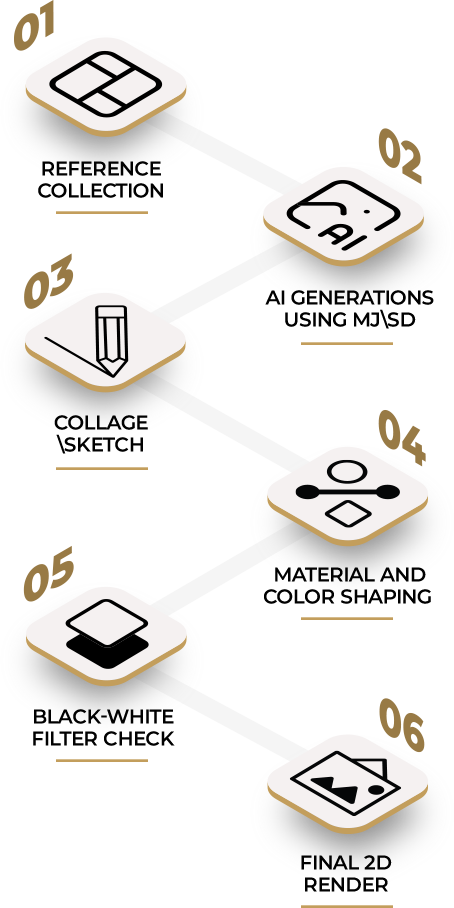
2D Video Game Character Workflow
The quality of our 2D character design services keeps in step with 3D services because our workflow for 2D game assets also demonstrates a high level of our skills.
- Reference Collection
We begin by collecting references and source materials that inspire us and inform the character’s design. This may include images, art styles, and character concepts.
- AI Generation
Sometimes we use AI tools to assist in generating character concepts or features. Many people underestimate how AI can help speed up the initial design phase.
- Collage/Sketch
For this phase, we create rough sketches or collages that serve as the foundation for the character’s design. These sketches usually help us a lot to explore different design ideas and compositions.
- Material and Color Shaping
To make the character’s style unique and interesting, we should define the character’s materials and color palette and determine the character’s clothing and accessories.
- Black-White Filter Check
You may ask: “Why do you need this step?”. The black-and-white version of the character design assesses the composition, values, and contrast and helps ensure that the character remains amazing and fascinating even without color.
- Final 2D Render
The final step is for our 2D art studio team to create the very last 2D render of the character. This is a polished and detailed illustration of how the character will look in-game.


Reference collection
AI generations using MJ\SD
Collage
\Sketch
Material and color shaping
Black-white filter check
Final 2D Render
3D Environment Design Process Steps
In addition to character design, 3D game environment design services are also essential. They can change the game's atmosphere and boost the gameplay experience several times.
Our studio created a special environment game asset workflow, and we want to share it with you.
What do you think is a first step? It’s a reference collection to catch the inspiration for the environment’s design. Then we move to working on concept arts to visualize and plan the overall look and feel of the environment. This stage is where we define the environment’s style, mood, and key visual elements.
Blocking out the main elements and structures of the environment involves creating basic shapes and volumes to represent the layout and major features. After blocking, we create 3D models for the environment’s objects, buildings, terrain, and other elements. And of course, to make them look more realistic we apply textures such as color, material, normal maps, and specular maps.
And time for the last step: we import the 3D models and textures into the game engine/rendering software where the environment will be used.


Reference
collection
concept art
Blocking
3D Modeling
Texturing
In-engine setup
+ lighting
2D Environment Design Process Steps
2D game environment design is a perfect opportunity for our team to showcase their outstanding creativity. The interesting complex workflow of designing 2D game levels is an additional approval to that.
In general, the workflow of 2D environment design is the same as 2D characters design and has six steps: Reference collection, AI generation, collage/sketch, material, and color shaping, black-white filter check, and final 2D render. The main difference is the focus on the environment such as surfaces, materials, and subtle elements.
Reference collection
AI generations using MJ\SD
Collage\Sketch
Material and color shaping
Black-white filter check
Final 2D Render
Game Cinematics Workflow Explained
Game cinematics is a difficult process because it has a lot in common with cinema art. Game designers should be able to create storytelling sequences, cutscenes, and in-game animations that will enhance the narrative and player’s experience. But our team is a superhero team so we know how to make everything as perfect as possible.
Firstly, we develop the storyline, script, and storyboard for the cinematic sequence. In this phase, we also define the characters, locations, and key elements needed for the cinematic. Then we adapt 3D character models and assets.
Now it’s time for the most intriguing part: performing motion capture for realistic character movements and planning the camera shots, angles, and pacing to visualize the cinematic sequence. We’re proud of our teams’ expertise and professionalism because they can make a game look like it’s a movie.
Also, we edit the footage, add visual effects, and perform color correction to finalize the cinematic. To make a huge emotional impact, we sync sound effects, voiceovers, and music to our characters, environments, and details. Voila! The small game masterpiece is ready :)
Our Steps for Creating NFTs Art
We can’t forget about NFTs too: it’s a significant part of our game-developing team, and we pay a lot of attention to transforming digital art into unique, blockchain-backed assets.
While providing NFT art creation services, we pay a lot of attention to details.
Because NFT process is not just about creating the art itself; it also involves understanding the NFT ecosystem, including blockchain technology.
This is the reason why our NFT workflow has 6 detailed steps.
Let’s talk about them in detail:
- Concept
We always start with a clear concept for NFT art. It’s extra significant to define the theme, style, and purpose of the artwork.
- Art Production
Depending on our concept, we produce the art in either 2D or 3D format. This stage involves creating the visual elements of the NFT, including characters, objects, or scenes.
- 2D or 3D Animations
Usually, our NFT art includes animations, so, depending on our teams’ chosen format, we involve 2D animations or 3D animations.
- Basic Traits Rendering
In this phase, we work with essential traits such as rarity, color variations, and other distinguishing features to make each NFT unique and high-quality. All of them should be ready for the NFT marketplace.
- NFT Collection Generating
We often generate the whole NFT collection, including minting individual tokens for each piece of art. This process involves creating metadata files for each NFT, which store information about the art, such as its title, description, and traits.
- Final Output
Once the NFTs are minted and the smart contracts are in place, we finalize the output by listing our NFT art on various NFT marketplaces for potential buyers to discover and purchase.

Concept
Art
Art
Production
2D or 3D
Animations
Basic Traits
Rendering
Own Render Farm
to quick in-house render
NFT Collection
Generating
Including metafiles and
support in preparing
Marketplace Contracts
Final
Output

Conclusion: Why Game Art Workflow Process Important?
Nowadays, we can’t imagine any game-developing company without a professional and well-structured game art workflow process. For us, it serves as the backbone for bringing a game’s visual and artistic elements to life. Also, due to it, characters, environments, animations, and cinematics are seamlessly integrated into the game’s narrative and mechanics.
In conclusion, the game art workflow process is significant for achieving artistic excellence, efficient production, and the successful integration of visual elements into games. It is a cornerstone of the game development industry, contributing to the creation of excellent and unforgettable gaming experiences.
4.4 / 5 91
No votes so far! Be the first to rate this post.
We are sorry that this post was not useful for you!
Let us improve this post!
Tell us how we can improve this post?
Share
